Onboarding Guide For Managers
Getting Started
If you don’t have a Translized account, follow this link to create one: https://app.translized.com/signup
Once you’ve created an account, we’ll send you a verification email to the email address you provided during signup. Once verified, you’ll begin your 14-day free trial which includes 50 000 strings and unlimited projects.
Create a Project
After verifying your account, visit this link to log in to Translized: https://app.translized.com/login
When you successfully log in, you can create your first project. The whole process is straightforward and shouldn’t cause you any issues, however, if you need any assistance, you can reach us at info@translized.com
Under ‘Your Projects’ click on ‘Add new project’ and customize it per your needs.
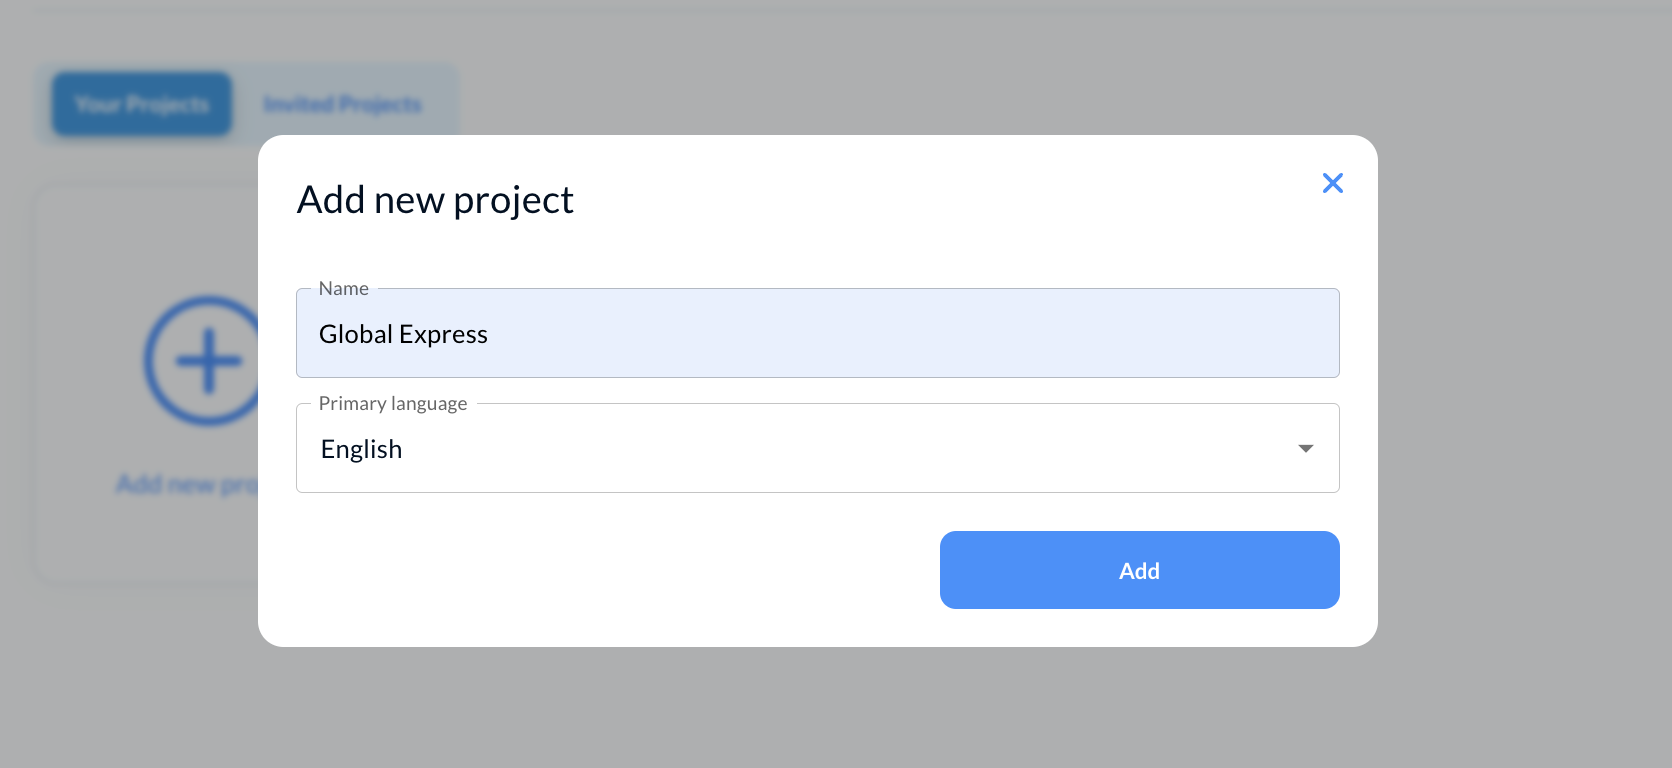
*Please note that the primary language you assign to this project can be changed later on in Project Settings.
Whether that be by platform, product or feature. It’s up to you, and Translized gives you all the flexibility you need.
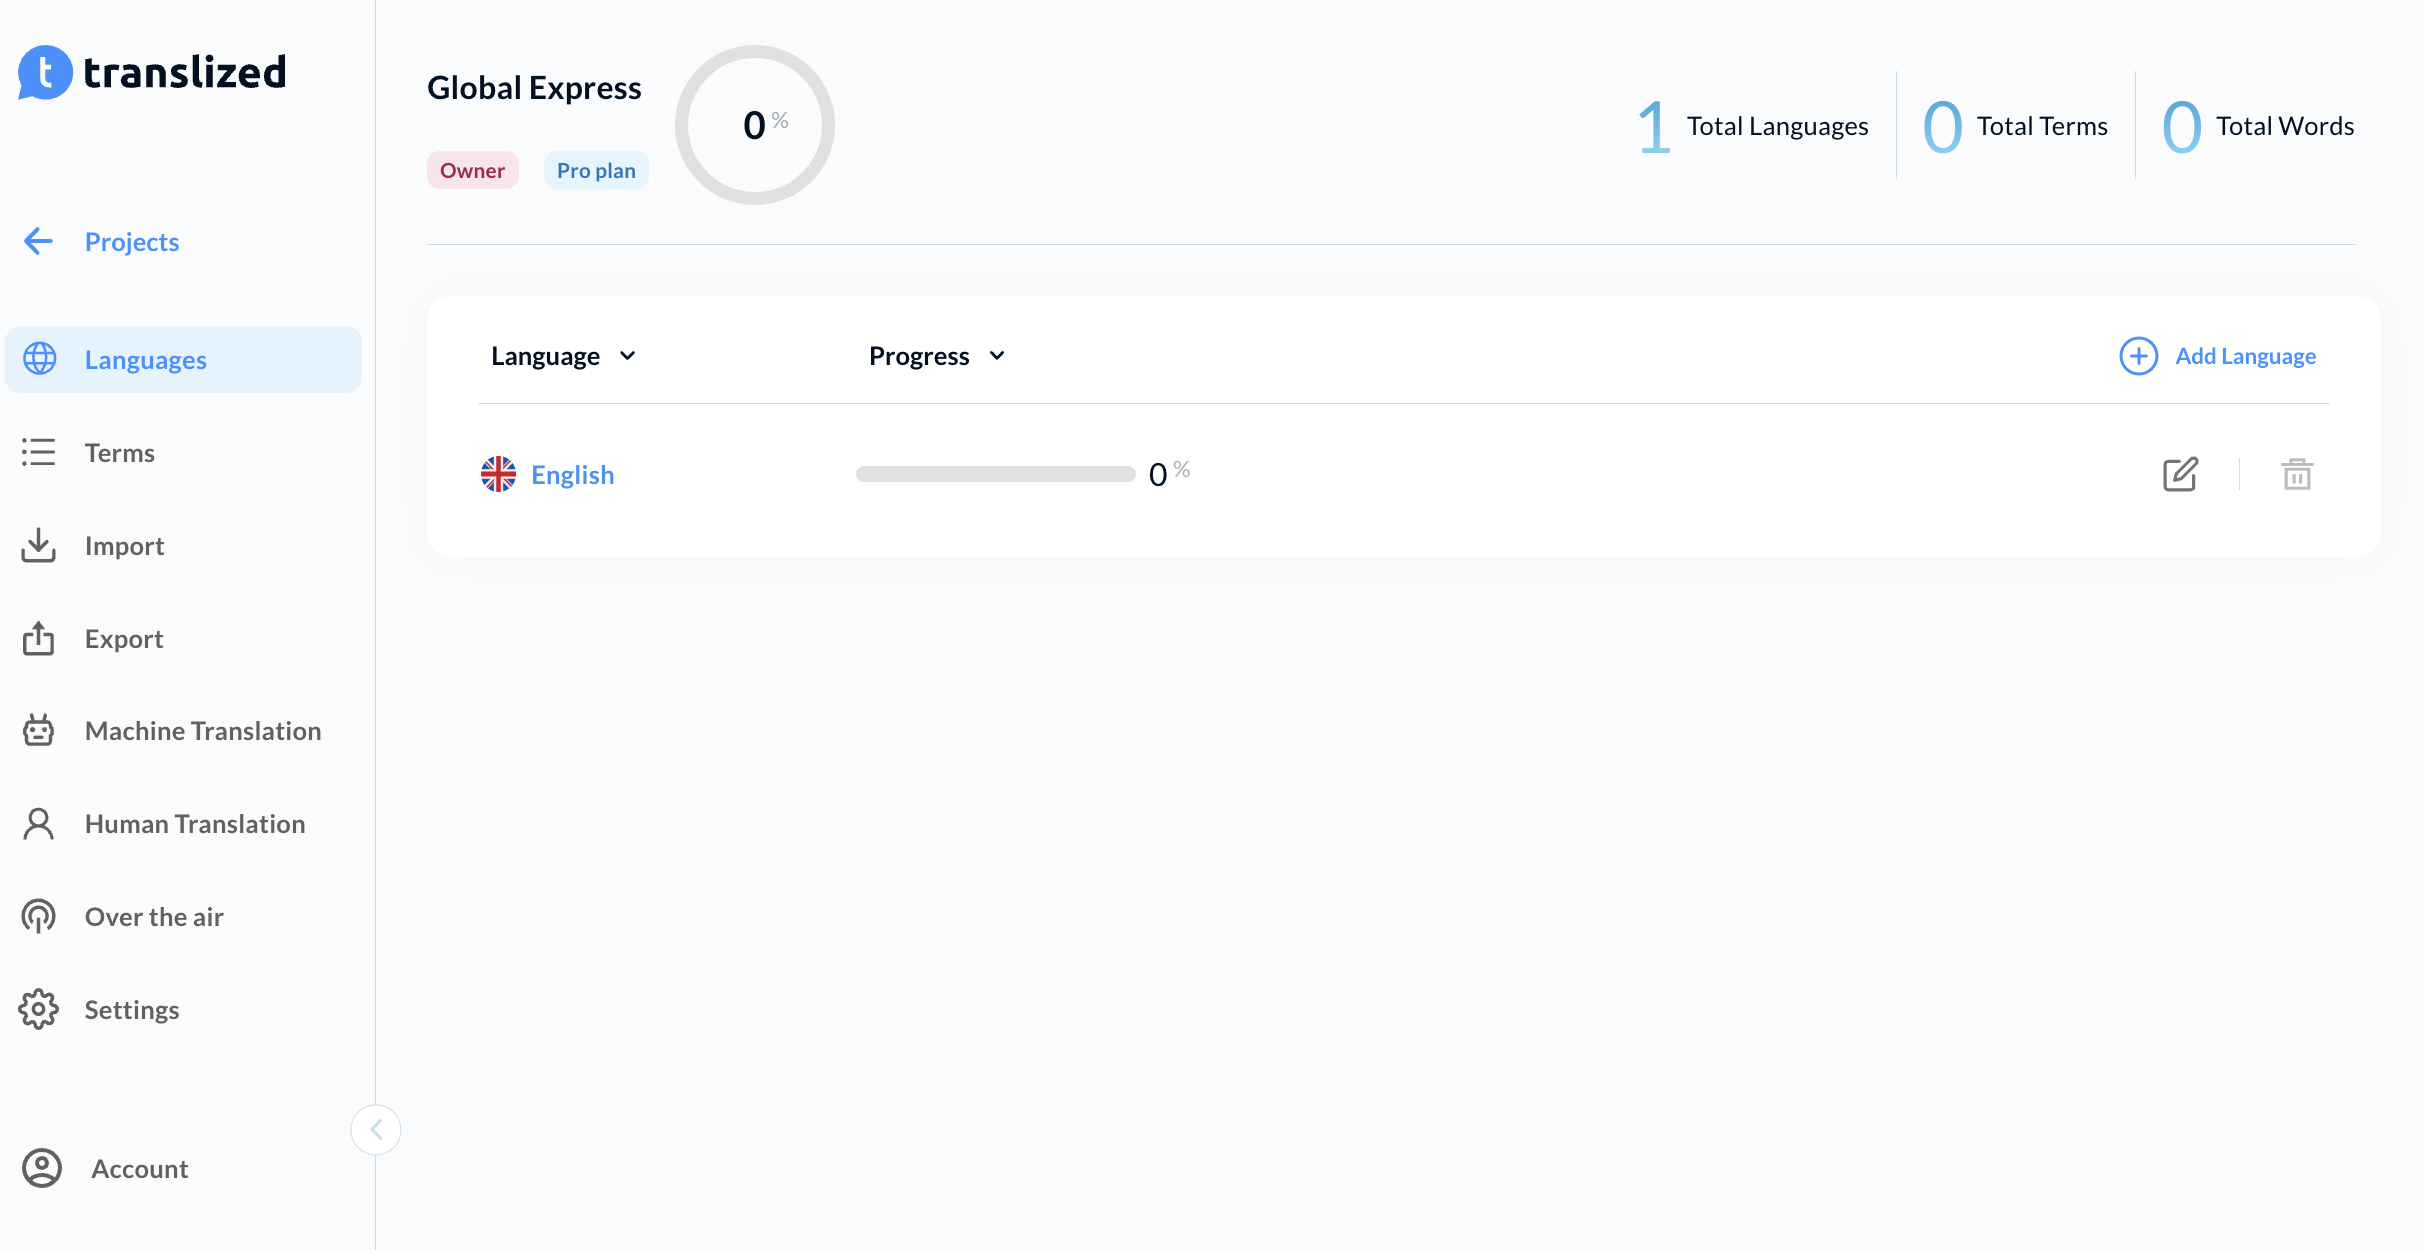
This is what the project dashboard will look like once created.
Import Keys
Once you’ve created your project, it’s time to add keys that need to be translated.
There are 2 ways to do that within Translized:
- Import a file
- Add keys manually
To import a file, visit the Import tab, placed under the Keys tab.
Translized accepts a huge variety of file formats you can import: Microsof Excel (.xlsx), CSV (.csv), Android (.xml), iOS (.strings), Java (.properties), JSON (.json), Angular (.xlf), YAML (.yml) .NET (.resx), ARB (.arb), PHP (.php), PO (.po).

To import a file, drag it into the import box or click on the ‘+’ sign to upload it. You have the option to override existing translations, but since you’re just starting out, you can leave this option blank.
Key tags can also be added on this step, but you’ll first have to add them in Project Settings.
Once you’re done and everything looks good, click on ‘Import File’ and you’re done. You can now go to the Keys tab and you’ll see that the keys have been added.

There’s also a possibility of manual key upload. On the Keys tab, in the right hand corner, there’s the option to add a key by clicking on ‘Add key’.
Fill in the information and when you’re ready, add the key. It will be added to the previously populated list of keys.

Invite Team Members
Once you’ve successfully created your project and added the keys, you can now invite your team members to collaborate with you.
To do so, go back to Projects, and you’ll notice the ‘Contributors’ page, where you can add new Admins and Contributors.

Because you are the one who created the project, you will remain the Owner of the project. Other team members won’t have the same permission level as you do, and you will remain the only person who can delete the project.
The Admin role will, beside the fact that they cannot delete the project, have all the permissions as you do.
The Contributor role will not be able to import or edit keys nor add new languages, order human translation and utilize the Over the Air feature.
When inviting an Admin, you’ll need to choose the Role and Project. When inviting a Contributor, you’ll have the added step of choosing the language(s) you want to add them to.

Once the Admin and/or Contributor accept your invitation, they’ll be able to access your Project.
Translate Keys
To start translating your keys, add an additional language, next to the primary language. You can add as many languages as you need.
By clicking on the ‘Add language’ option on the right hand side, you’ll be able to do so.

Once you add your new language, the progress bar will be at 0% until you start adding your translations.
There are a few different ways you can translate your keys in Translized.
You can do it manually, by clicking on the language and adding translations for each key. This is most commonly used when working with a translator.
Translators have multiple options that can help them along the way, such as Translation History, Translation Memory and Machine Translation.

As an Admin, you can also view previous changes made to the Key by utilizing Translation History.

For more information about manual translation, visit Translized’s Guide for Translators.
Another option you have with Translized, is to translate the keys with the help of Machine Translation.
The Machine Translation tab is placed below the Export option in the left hand side menu. By default, you’ll have 1000 characters at your disposal, but you can always purchase more through the app.

Once you select the languages, click Translate, and your keys will automatically be translated.
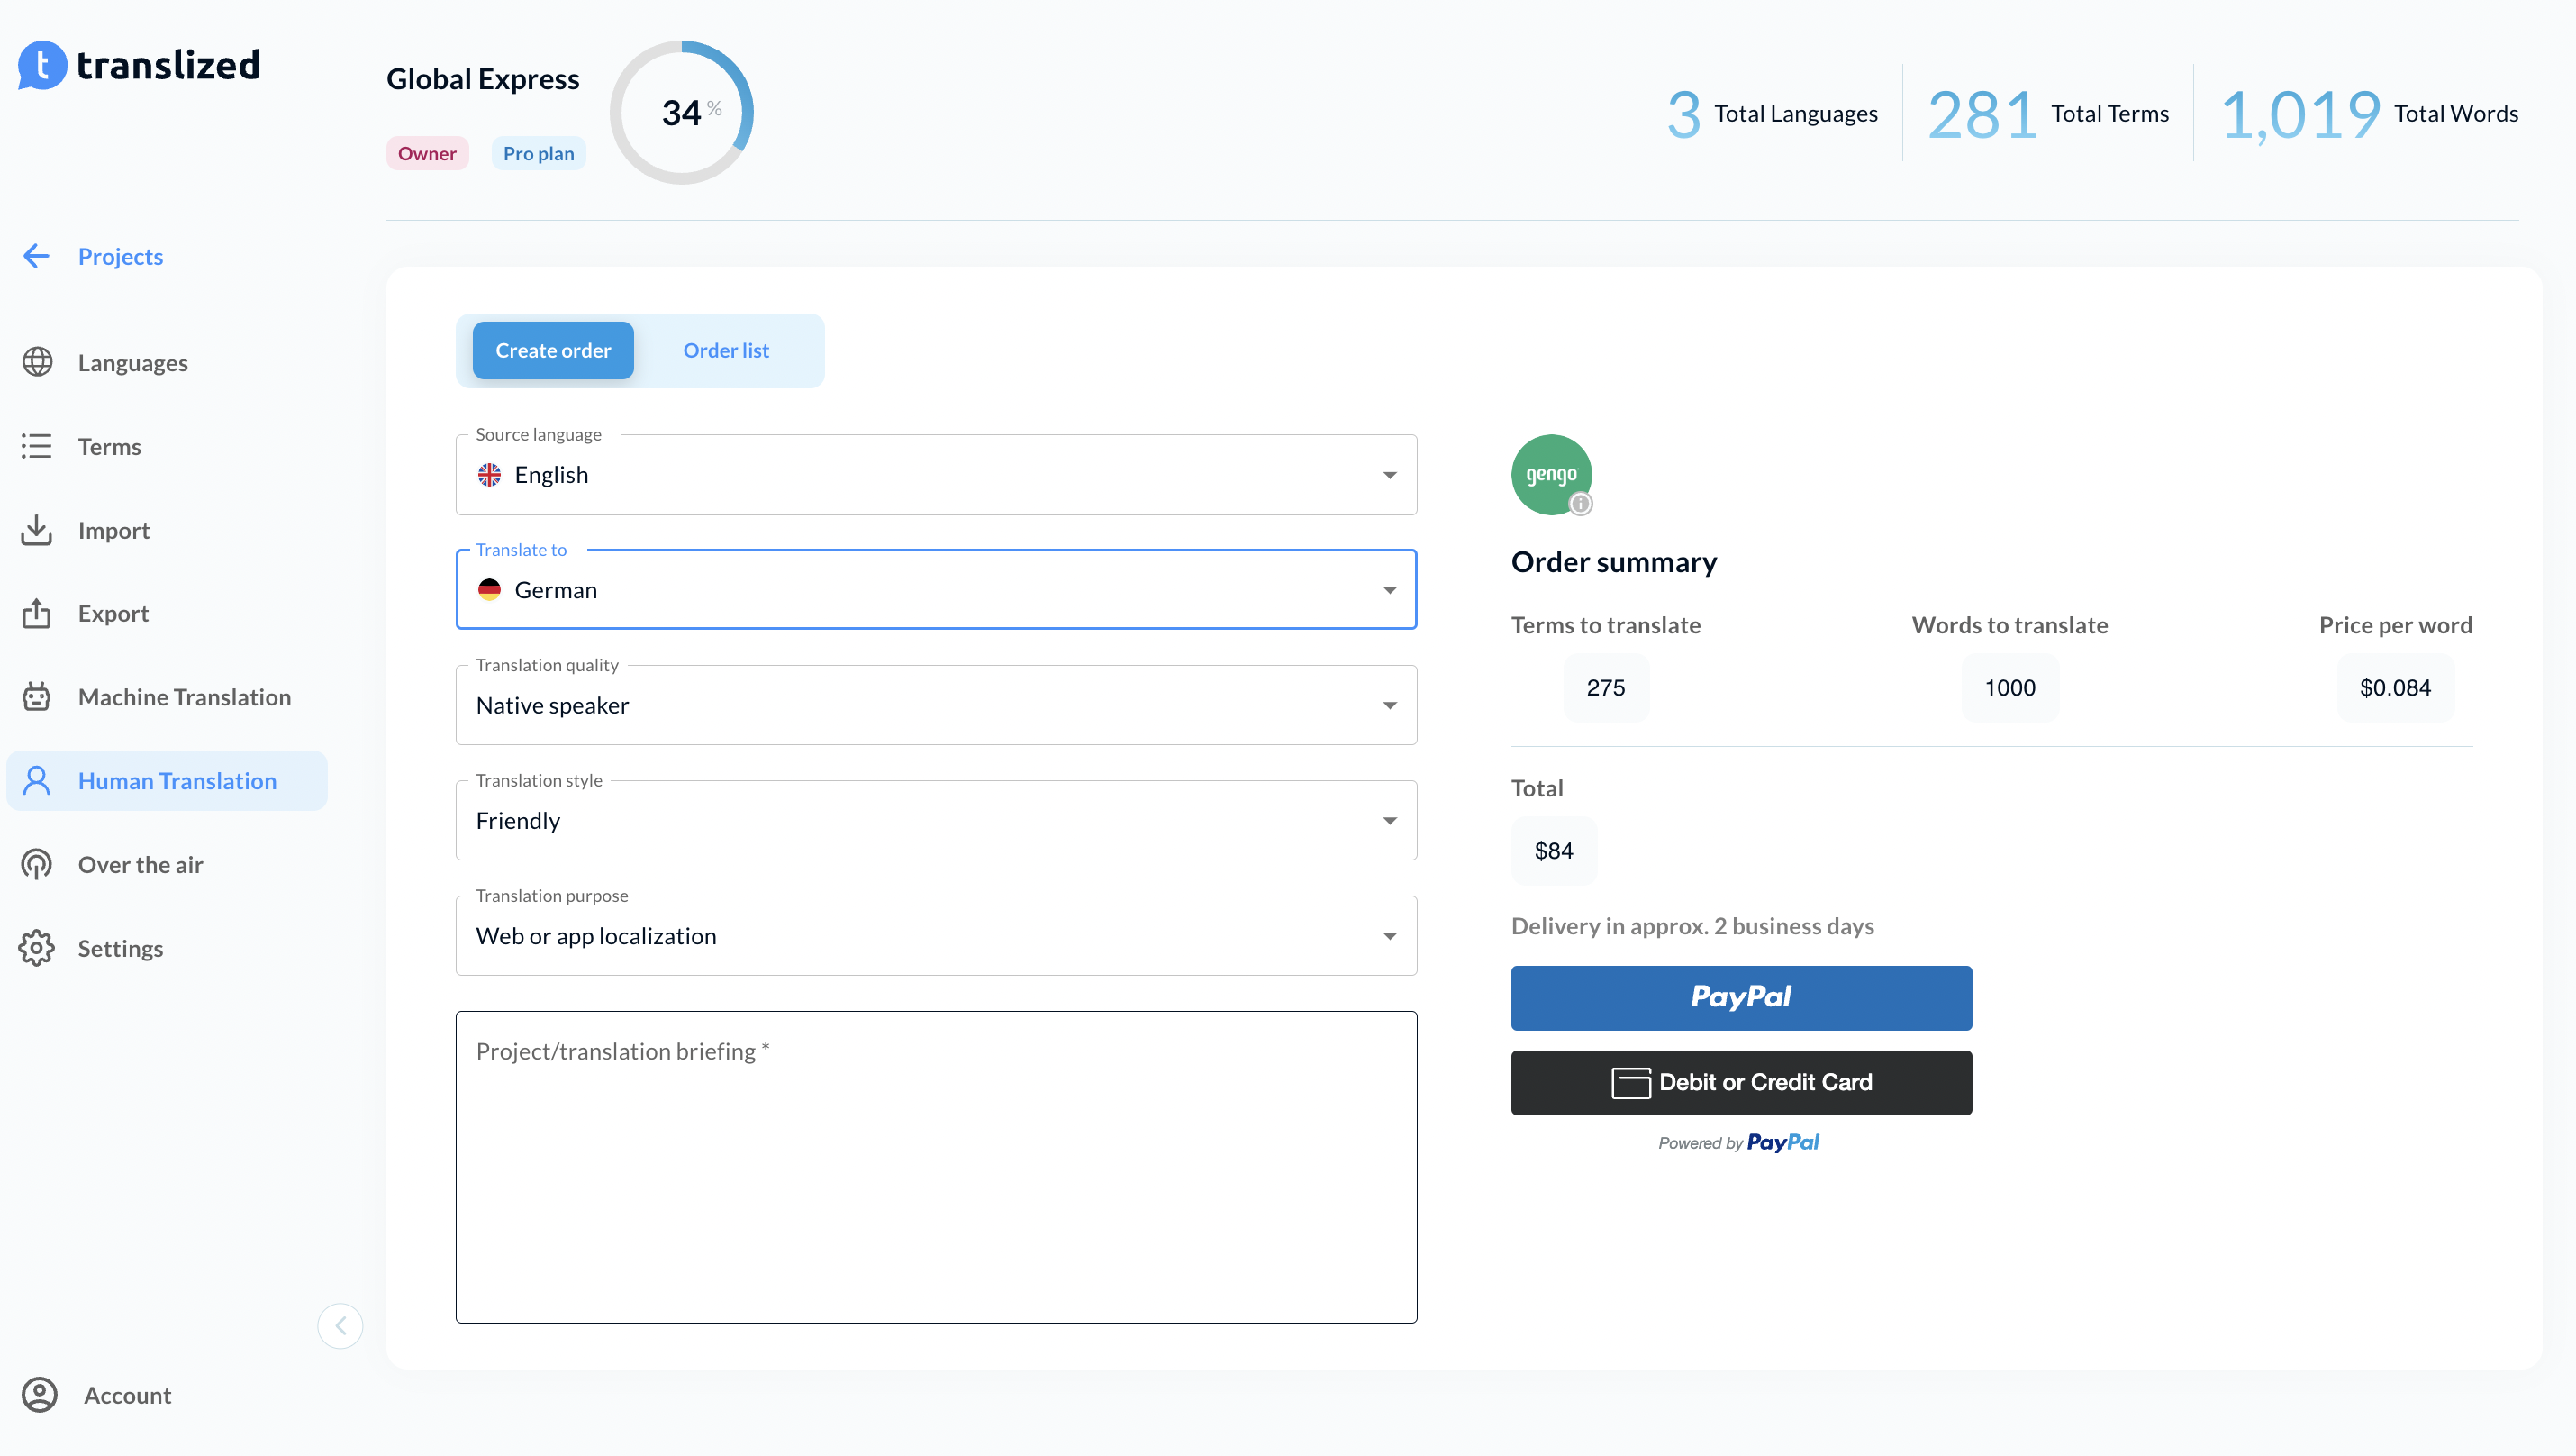
Another way to translate keys in Translized is to order Human Translation. This is an option Contributors cannot access.
To order translation from a professional translator, visit the Human Translation tab, and enter the necessary information about the translation.
You’ll get an estimate on what the price of the translation will be. And you can always review your orders by visiting the tab ‘Order List’ on top.
Manage Keys
When on the Keys tab, you can easily edit each one by clicking on the three dots next to the key. On here, you can comment, edit the key or delete it.
If you want to edit the key, add context or key tags, you can do it from here. Please note that if you want to add a Key Tag, you must first create it in Project Settings.

Additional option you have on this view is ‘Quick translate’ allowing you to translate the keys without going into individual languages.

For full customization of the Key, you can click on the Key name, and a new page will open, giving you complete flexibility over the key.
On here, you have the added functionality of adding context screenshots that can help your translators translate the key in a more precise way.

Communication
We know how important communication is, that’s why we’ve added additional benefits within Translized that can help you communicate with your team members with ease.
Each key has the option to leave comments with the additional functionality to mention team members. We’ll notify the user mentioned via email, so they can view your comment as soon as possible.

Another way to communicate is through key tags which can be created in Project Settings.
To create a new Key Tag, click on ‘Add’ under Key Tags and add the color and the name.

Once created, you can easily add them to certain keys, which can help your team members know what the status of each key is.
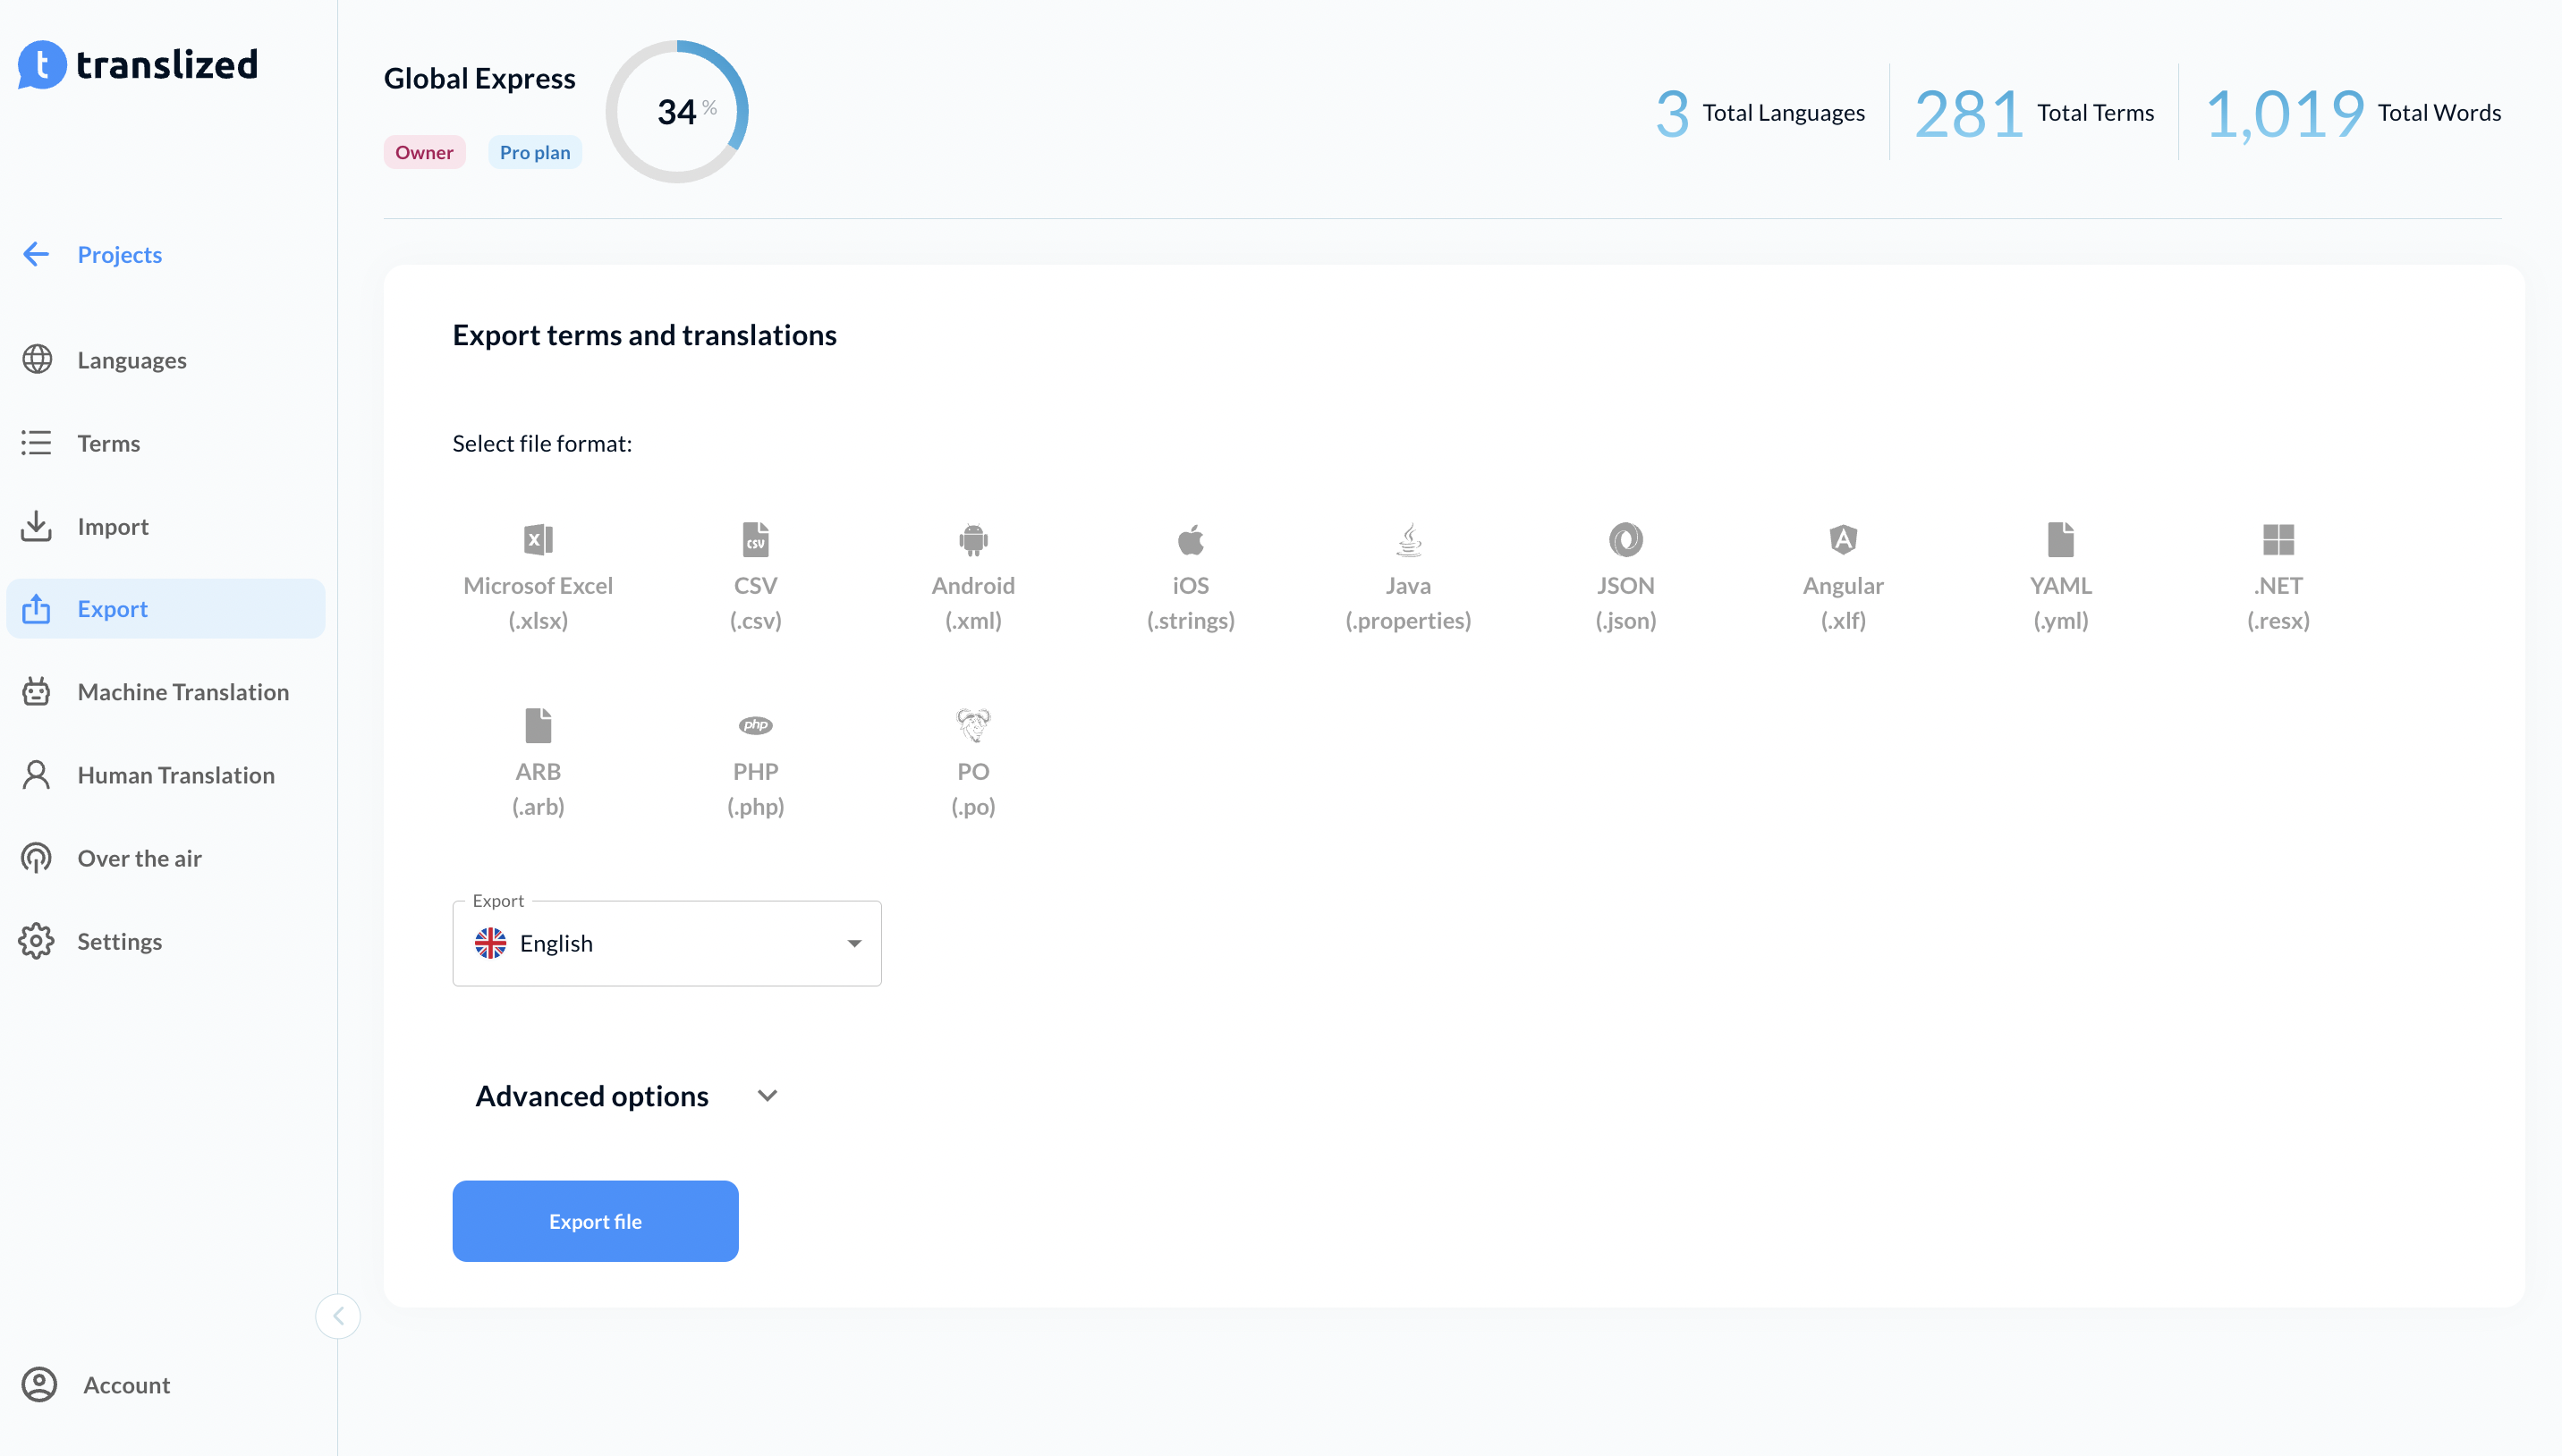
Export Translation
Once your translation is ready, you can easily export it in the 12 file formats supported by Translized.
Visit the Export tab on the left hand side, select the file format and language you want, and you’re good to go.
You have the additional option of adding a custom file name and replacing empty translations with primary language translation.
And lastly, if you ever want to change your subscription plan or purchase more machine translation characters, you can do so on the Billing page, which is accessed by going to: https://app.translized.com/account/billing
If you want to learn more about Translized, visit our blog which is packed with helpful tips on how to run smooth localization processes: https://www.translized.com/blog or visit our website at: https://www.translized.com/